Thursday, September 28, 2023

Use of Perspective - Spaceship

For this week's assignment, we had to create something from the theme of 'Transport' using one of the three perspectives. 


I choose a spaceship as my model. Astronomy has always been a big fascination of mine, and one of the things I wanted to explore with this pipeline was how to make a deceptively complex looking spaceship using 3D tools in as short a time as possible. 

Here's my reference board.

I rather like how this came out, honestly, especially with Arnold as a renderer. I still prefer the renders I get in Unreal, though. 

The background of the final artpiece is abstract, and is supposed to represent how this ship navigates as easily in space as it does on planets. My inclusion of the shadow was deliberate, meant to evoke the two habitats. 

Let me know what you think.

Monday, September 25, 2023

Project #6 - Crate and Barrel Scene

This week's assignment was geared towards learning the industry pipeline of asset production from a practical perspective. As such, the assignment (the creation of a simple crate) is actually split up over the course of three weeks, leading up to the industry review.

I decided to challenge myself while still keeping true to the instructions provided. 

So I took it upon myself to create not just a crate, but also a barrel, a mug, some supports for the barrel to rest upon and a faucet through which wine would pour through from the barrel.

I probably shot myself through the foot with this one, not because this was difficult. But because, next week, I'm gonna have to sculpt the whole lot. (Sigh) However, I'm really looking forward to texturing it, so I think it'll balance out.

Here is a render of the proxy version of the assets. I used this to set up some basic lighting in Unreal, then came back to Maya and up-resed the models. 

Here's the reference board I collected, along with the primary references (enlarged on the board) and added below. 


Below, I have also attached some rough screenshots/WIPs of the assets, and their corresponding scale ratio with a mannequin model I imported from Unreal. 


Regardless, I really enjoyed working on these. Far more than I expected, honestly. It's very relaxing, working on something so simple, but also could have the potential to be more, if you really push it.

Thursday, September 21, 2023

Samus - Concept Illustration

For this week's assignment, we were to take one of the chosen outlines from the previous project, and create a full concept illustration from it. I chose Samus, as I found this particular design from Sunny Zheng to be incredibly detailed.


Monday, September 18, 2023

Project #5 - ZBrush Hammer (WIP)

 This week's assignment was about creating weapons within ZBrush. We were given a bunch of references, and instructed to choose one. I bit off more than I could chew on this one, because I didn't manage to finish it before the deadline. Hopefully, over the next few weeks, I'll carve out some time to finish it, even though my grades might suffer.

My reference was Erica Cai's Darksiders 2 Death Hammer. Her work is amazing, and I regret I didn't quite manage to capture the essence of it in my version. Oh well, only way to go is up right?


Thursday, September 14, 2023

Value and Contrast

For this assignment, we needed to take three characters that survived the previous round of silhouettes, and turn them into full-fledged greyscale characters, with clean linework, value patterning in the style of the Dota 2 Workshop - Character Art Guide, basic lighting and shading and finally a gradient that brings them all together. 

I borrowed two designs from Jessica Blask and one from Beste Unlu.


As I'm unfamiliar with these characters, I came up with my own backstories of them, based on whatever I managed to carve out of the silhouettes. This turned to be surprisingly a fun exercise. 

BABY WARRIOR


QUEEN ELF


SELLSWORD VENTRILOQUIST


Monday, September 11, 2023

Project #4 - ZBrush Head

This week, we had to familiarize ourselves quickly with ZBrush, the 3D sculpting software, and the best way to do that is to plunge right in. To that end, our task was to create a simple bust, with recognizable features such as eyes, nose and mouth. 

It could be something completely out there like a dragon, so as to not tread on every aspiring character artist's dreaded nightmare - the 'uncanny valley'. But I figured, where's the fun in that?

I love sculpting, and while I have no designs to work on characters, I can't deny there's something incredibly compelling about the second-hand knowledge of anatomy we absorb just from this process. Repeat it a hundred times, and you might get hundred different results where your character looks completely different each round, but you'll be able to name every muscle and bone that comprises our human head.

I started with a sphere, and shaped it to have the slightly squarish features of a strong-jawed man. 


Then I pulled out the ears, the neck and the shoulders, and started carving out the basic details of the ear, and strengthened the shape of the jaw a bit.


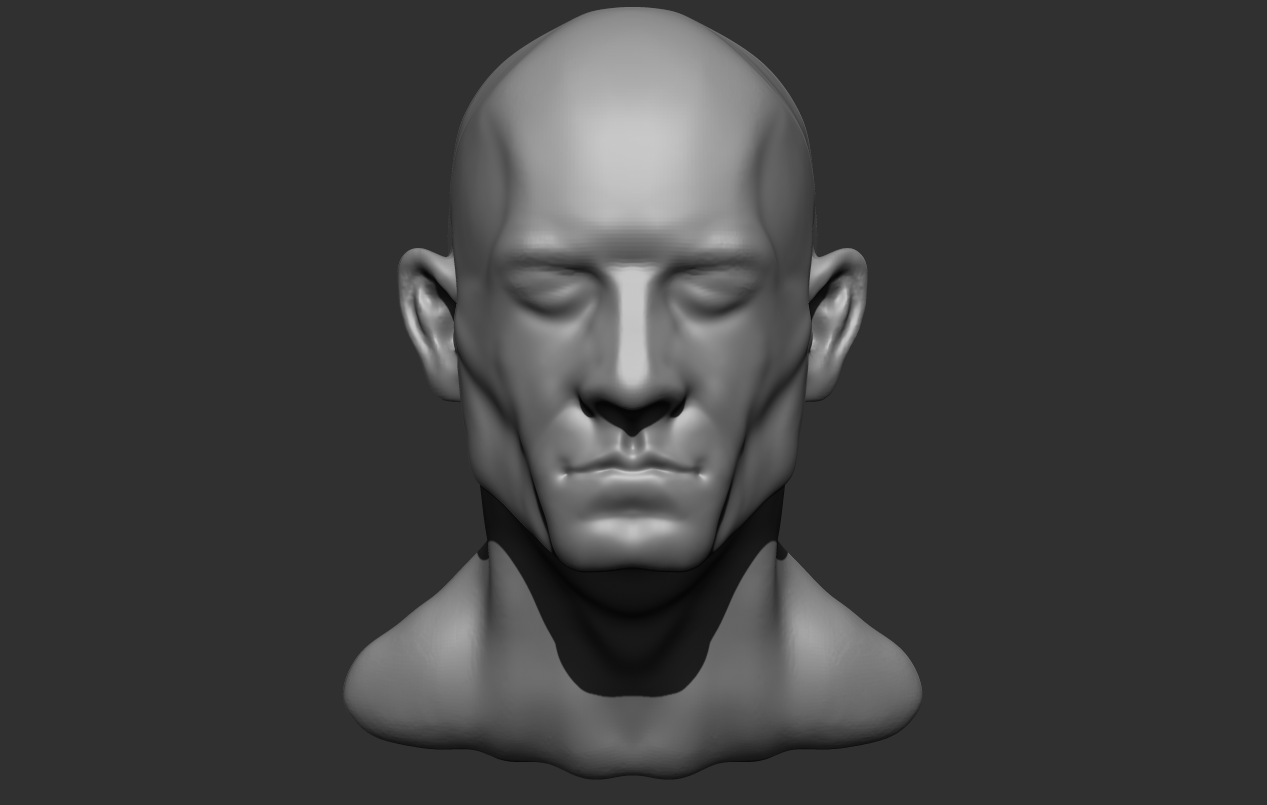
Then I boiled down the rest of the muscles of the face. Instead of adding features to the head, I removed elements of the mesh to make way for the shapes themselves. It's like what Michelangelo said about David: 'I created a vision of David in my mind and carved out everything that was not David'.


The mouth was hard, and I'm still not sure I managed it. I suspect, though, that a woman's mouth would be much harder to work with.


I didn't want to focus overly much on the eyes, so I just left them as blank orbs. 


The hair, too, is simple brush strokes. I was going for a younger, less stern look but them's the breaks, I suppose. I'm still not entirely familiar with character sculpting, but I did get a good, long look at ZBrush and how it works, so... task accomplished?


Thursday, September 7, 2023

Samus - Silhouettes and Thumbnails

I chose Samus from the Metroid story world as my subject for the silhouettes and thumbnails assignment. I'm not familiar with this character, but I felt that just added to the challenge of working with her, because if I chose to go the concept art route, I'll be working on a plethora of characters that are completely unknown to me.

I modified Samus slightly. Instead of a hand cannon, she now has a 'spike cannon' welded to her right arm that can also work as a spiked mace in melee combat. I also added some spikes to her pauldrons (shoulder armor) and greaves (foot armor). The triangular shapes give her a more menacing look, which is what I was going for, but it also gives her a medieval aesthetic, which I hadn't intended, but nevertheless is a happy accident.  


I feel like the silhouettes turned out better than the thumbnails. This is an entirely new exercise for me - at least from a practical perspective. I have skimmed through the theory of silhouetting characters and environments in video games and the like, and how it is the first step to conceptualizing a character.

I still have a lot to learn when it comes to thumbnailing. 


Let me know what you think!

Monday, September 4, 2023

Project #3: Garden

Using the techniques learned in the previous projects and a few new ones, I created a sort of vegetable garden in a Minecraft-like art style.

Initially, after coming across the reference for this project, I created a PureRef file with all the different and unique textures I would need to create to bring this environment to life. 


Then, in Maya, I unwrapped the cube and laid it out in a specific pattern, which would help me in identifying which texture would go on which UV shell. This then allowed me to work easily in Photoshop, as all I had to do was to paint the appropriate texture on where the appropriate shell would be, without guesswork. Reimporting the texture to Maya allowed me to map it out correctly and get a preview of the cube. 
 

I reiterated this process multiple times for all the other textures I needed to create. Then I imported all the assets into Unreal. 


In Unreal, I created a master material in a manner similar to how I did for the previous projects, with a few extra parameters for much more nuanced control, should I need it. 


I instanced the Master Material multiple times for each of the different textures I needed, and applied them on the cubes wherever necessary.


Transparency was a challenge, and even now I don't think I have fully understood Unreal. Especially when it insists on messing up the base color of my textures, forcing me to go back into Photoshop and change it. Regardless, I am proud of how this came out. Later, I'll render a video so I can demonstrate the bobbing motion of the water shader.


Please let me know what you think.

Module 4 - Environment Part 04 [Lighting]

PERFORCE SUBMISSION