Thursday, August 31, 2023

Pikachu - Basic Shapes


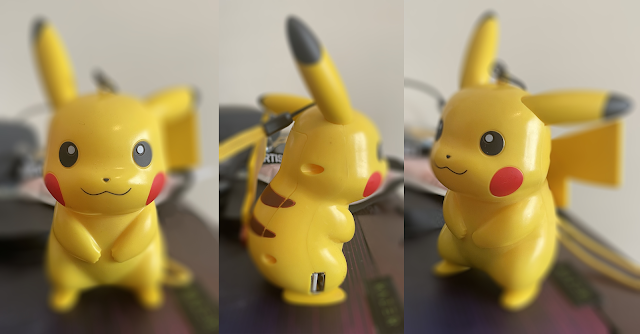
For the Basic Shapes assignment, I had to pick a character from the lineup of the original Nintendo Smash Brothers game. Perhaps my choice of Pokémon seems obvious from my previous blog post, where I created Charizard using Block Sprites, but I had another reason that is not so apparent. I already had a physical reference to work with - a Pikachu wireless charging port that I own. 


Technically, I was supposed to break down the character to primary shapes - spheres, cubes, cones etc. But I think this turned into secondary shapes instead, with far too much detail than what the assignment originally called for.

I was provided a Huion drawing tablet and accompanying stylus, and almost immediately, I fell in love with them. They're incredibly smooth and user-friendly.

The tools I used the most were the Pencil BigStrokes and the Airbrush Soft Round 50% Flow from Nick Zuccarello's Photoshop Brush Tool Presets. BigStrokes were used for a quick and easy outline/tracing of the reference images. The Airbrush was what I used to shade. Smudge tool was used to create a nice, seamless transition between the different color shades. I think I was still getting the hang of the tools in the first sketch, but had boiled it down in the second and the third, which is why you can see higher levels of contrast which bring out the nuances of lighting.

I inadvertently relied on the reference for my lighting a little too much, because, as you can see, the specularity is rather high in the sketches, almost making them look a little plastic, much like the charging port itself. 

In hindsight, the lighting could've been a lot better, and I could've actually chosen a better background than a messy desk. Otherwise, I'm rather proud of this one. 2D Art is not my forte, so I challenged myself to achieve this without using 3D models. I suppose I did cheat with the reference. But nevertheless, this is a decent start. 

Monday, August 28, 2023

Project #2: 3D Sprite

Technically, I was supposed to work on either the 2D Sprite project or the 3D, not both. But I'm a bit of an overachiever. Besides, there were valuable and unique instructions to both, so I'm rather glad of this.

The base (once again, made of beveled cubes imported from Maya in the earlier project) is identical to Nick Zuccarello's tutorials, but I wanted to work on something different for the actual model, so I dug around and found a pixel art gif of a retro sci-fi hover car that I particularly liked. 

(Reference Image) Gif from the Slynyrd blog, cyberpunk section.


Funnily enough, the bobbing animation that Mr. Zuccarello demonstrated is also present in the gif itself. So that gave me an additional reference to work with.


The fog could be better. And in hindsight, I should've added reflectivity to the glass windows, rather than specularity. But still, I'm rather proud of how this came out. 


I got a bit of a jitter in the render of the level sequencing video. Not entirely sure what that's about. 


Thanks for checking this out. Any feedback would be appreciated.

Tuesday, August 22, 2023

Project #1: 2D Block Sprite

This was a project aimed at getting us familiarized with the workings of Maya and Unreal. 

Maya wasn't really involved all that much, except to create a relatively high poly cube that would become our block cube (static mesh) that we would use to create the 2D Sprite. 

Downloaded from https://pokemondb.net

For the reference image itself, I wasn't originally gonna go for the Charizard (I didn't even think about it), but then I discovered that some websites offer free zip files of all the Pokémon creatures from every game, all the way from Red/Blue/Green generation to the Black/White generation. So this became rather an exercise in nostalgia, which, honestly, is a very good way to not just learn the process, but retain it.

Unfortunately, the original sprite size was 64X64 px, and when I tried resizing it to 32X32 px, the already quite pixelated image became almost unrecognizable as Charizard. So I kept it the way it was, which inevitably took a toll when it came to actually arranging those blocks. But when I saw the final product, I realized those two-and-a-half hours were well spent.


I especially like the shimmer of the silvery-grey background blocks. I didn't plan for it, and I'm not entire sure how it came about, honestly. Perhaps a combination of the sprite plane's emission, the rectangular light and the fog? I might create a gif with that shimmery effect one of these days and post it here.

I didn't quite get the lovely border glow from the sprite plane beneath the 2D blocks that Nick Zuccarello got with his Mario demonstration. That might be because of the sheer scale, which drowns out that effect. Maybe ramping up the emission of the plane might do the trick.

Thanks for checking this out. Let me know what you think.


A Barren Planet Caught in the Gravitational Pull of a Black Hole - Digital Piece


Module 4 - Environment Part 04 [Lighting]

PERFORCE SUBMISSION